Icon64 - ESP32 with RBG LED & audio§
How to configure and hack the ThingPulse Icon64.
You can either install pre-built apps to the Icon64 or program the device yourself. See Icon64 projects for a list of applications provided by ThingPulse.
Using the Stock Firmware§
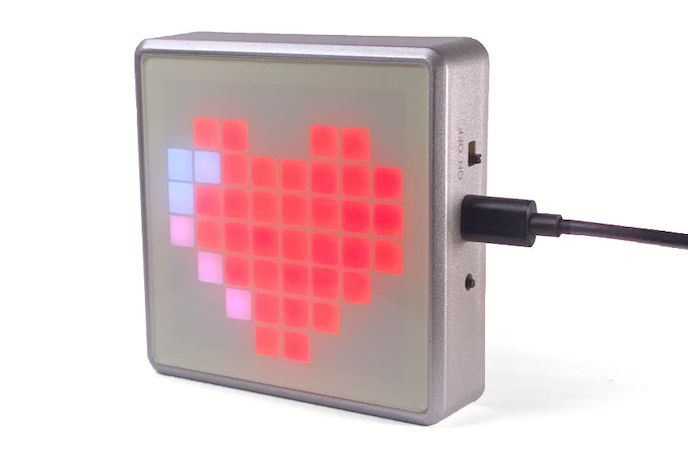
Icon64 ships with stock firmware pre-installed. It turns the Icon64 into a Bluetooth speaker with integrated 8 band spectrum analyzer.
To get started simply connect the device to a USB power source. Then use the power switch on the side to turn the device on. The device will display a pulsing heart like shown above. Now open the Bluetooth settings on your smartphone or computer and connect to the device called "ThingPulse-Icon64" and play some music. Watch the following video to see the hole process:
Installing Apps on the Icon64§
ThingPulse offers an app store like application for your computer to install apps on the Icon64: the App Fairy. The App Fairy comes as a single executable for macOS and Windows that does not require installation - just download and run it. The only prerequisite is the installation of USB-to-Serial driver for communication between your computer and the device.
- Install drivers as documented below
- Download the latest App Fairy for your platform from https://github.com/ThingPulse/app-fairy/releases
- Connect the Icon64 to your computer using a USB data cable
- Turn on the Icon64
- Run the App Fairy
- Select application
- Enter configuration values
- Press the "Install Application" button
Tip
If new apps or updates to existing apps become available they will automatically load the next time you run the App Fairy. Hence, you do not need to update the App Fairy to use the new apps.
Programming the Icon64§
The following chapters describe how you can compile and install applications onto the Icon64. We use the stock firmware as an example but the process is exactly the same for any other application.
For a list of apps provided by ThingPulse see Icon64 projects.
Install Drivers§
A prerequisite to program ESP*-based modules usually is to establish a communications channel from your development platform (PC, Mac, Linux) to the device over USB. This in turn requires your system to detect the USB-to-Serial (aka USB-to-TTL, aka USB-to-UART) adapter on the ESP8266 or ESP32 module. There are two commonly used adapters in the wild these days:
- Silicon Labs CP210x
- Winchiphead CH340x / CH341x
Newer boards (2022+) often use the Winchiphead CH9102 chip.
Popular modules that use the CP210x are:
- NodeMCU v1.0 (i.e. V2) module
- WeMos D1 mini Pro (some revisions)
- ThingPulse ePulse ESP32 dev board
- ThingPulse Icon64
Examples of modules that use the CH340G chip are:
- WeMos D1 mini
- D1 mini Lite
Examples of products that use the CH9102 chip are:
Note that there is no harm done if you install both drivers even if you currently just use one! If you are not sure which adapter your ESP8266/ESP32 module uses then just install both.
Silicon Labs CP210x§
Silicon Labs maintains a page in English that lists downloadable driver binaries that also contains installation instructions.
Winchiphead CH340x / CH341x§
Winchiphead (WCH) maintains its website only in Chinese. However, the download page for the drivers is so simple that even non-Chinese speakers will find the right download link.
Warning
Some systems require a reboot before the driver installation can be successfully completed. The installer may or may not tell you about this! If you later connect the ThingPulse device and the system does not recognize it try rebooting as a first measure..
Winchiphead CH9102§
Follow the instructions over at Adafruit.
Install PlatformIO IDE§
All ThingPulse Icon64 sample projects are built with PlatformIO. Hence, to use those samples as-is it is required you create a local PlatformIO setup.
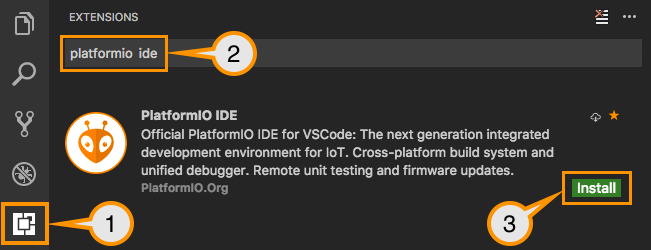
Download and install official Microsoft's Visual Studio Code, PlatformIO IDE is built on top of it
- Open VSCode Extension Manager
- Search for official PlatformIO IDE extension
- Install PlatformIO IDE.
Check Platformio Quick Start guide (highly recommended).
Get the Stock Firmware§
Now that the driver is installed and Visual Studio Code runs with the PlatformIO plugin you can compile and install the stock firmware.
Get the stock firmware repository either with Git:
or by downloading and extracting the ZIP file from that URL.Once done open the esp32-icon64-a2dp folder in Visual Studio Code.
Upload the Stock Firmware§
Please connect your Icon64 to your computer with a USB data cable and turn the device on by sliding the power switch into the "ON" position.
Have a look at the platformio.ini. Before you can upload you need to verify and likely adjust the following two lines:
They name the USB serial port through which the Icon64 is connected to your computer. The example above works as-is on macOS. On Windows this might be something like COMX with X being a number between 1 and 9. To figure out what you should place here have a look at the PlatformIO documentation
Now look for an arrow on the lower left of your Visual Studio Code IDE:

Click this button to download all libraries, to compile the code and to upload the binary to the device. The first time this process might take a bit longer since PlatformIO needs to download the ESP32 tool chain as well as all required libraries.
If everything was succesfull you should see an output similar to this one:
Writing at 0x000a4000... (100 %)
Wrote 1051168 bytes (619238 compressed) at 0x00010000 in 10.9 seconds (effective 768.2 kbit/s)...
Hash of data verified.

Leaving...
Hard resetting via RTS pin...
=========================== [SUCCESS] Took 18.40 seconds ===============================
Hardware Specification§
Before you start building your own projects it might make sense you first familiarize yourself with the hardware components. To tinker with the hardware take a look at the schematic of the board.
In order to develop for the Icon64, learn about the following building blocks.
RGB LEDs§
The Icon64 contains 64 WS2812B RGB LEDs in a 3030 package. They are individually addressable over GPIO32.
The LEDs indexes are as depicted in the following diagram:
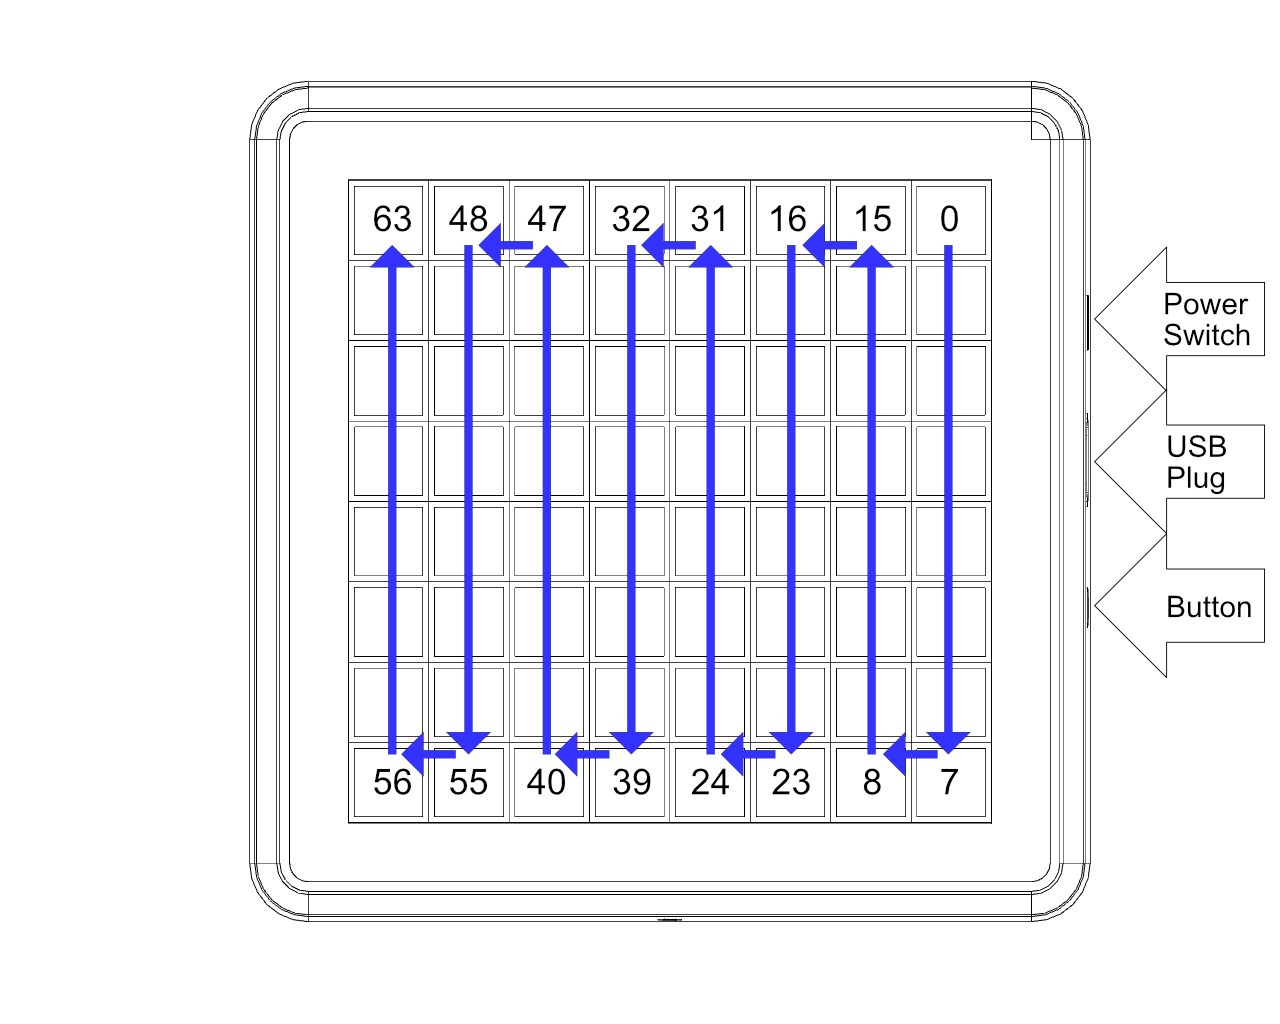
The following function converts x/y coordinates in the range {0..7}/{0..7} as shown below to a LED index in the range {0..63} as seen above.
uint8_t getLedIndex(uint8_t x, uint8_t y) {
  if (x % 2 == 1) {
    return 63 - (y + x * 8);
  } else {
    return 63 - (7 - y + x * 8);
  }
}

To drive the LEDs we recommend either of the following two libraries: roboticsbrno/SmartLeds, fastled/FastLED.
Let's have a look at how to use the FastLED library:
#include <Arduino.h>
#include <FastLED.h>

// LED Settings
#define NUM_LEDS          64
#define DATA_PIN          32

// Define the led chain
CRGB leds[NUM_LEDS];
uint8_t counter = 0;

void setup() {
    Serial.begin(115200);
    FastLED.addLeds<WS2812B, DATA_PIN, GRB>(leds, NUM_LEDS);
}

void loop() {
  FastLED.clear();
  // Activate one pixel after the other
  // and cycle through the color wheel in HSV
  leds[counter % 64] = CHSV(counter, 255, 100);
  counter = (counter + 1) % 256;
  FastLED.show();
  delay(100);
}
Audio§
The ESP32 is connect over I²S to a MAX98357a chip. The I²S bus requires 3 pins: DOUT, BCLK, and LRC. The mode pin is used to enable audio output with an active high on GPIO33.
| MAX98357a | ESP32 |
|---|---|
| DOUT | GPIO25 |
| BCLK | GPIO26 |
| LRC | GPIO22 |
| MODE PIN | GPIO33 |
Important
Unless you pull GPIO33 high the speaker will remain quiet.
There are two audio libraries we use ourselves and can thus recommend
- schreibfaul1/ESP32-audioI2S, used in our tooth fairy app
- earlephilhower/ESP8266Audio, used in our stock firmware
Tactile Switch§
The Icon64 also offers a button to control the device. The state of this pin can be read out on GPIO39. GPIO39 is connected with a 470Ohm pull-up resistor.
A simple but powerful library to handle button presses, long presses, interval presses etc. is evert-arias/EasyButton. EasyButton allows you to attach callback functions to certain button events. Use callback functions to run specific code when the event gets triggered.
Icon64 projects§
Bluetooth speaker§
The Bluetooth speaker is the Icon64 stock firmware. It uses the LEDs to display the output of the integrated 8 band spectrum analyzer.
Tooth Fairy§
The Tooth Fairy makes brushing teeth more fun for you and/or your kids. It is a coloful webradio countdown.
CO₂ Monitor§
The CO₂ Monitor application requires an MH-Z19C or Sensirion SCD4x CO₂ sensor (plugged or soldered to the PCB). Displays the current ambient CO₂ level and acoustically alerts when defined warn/alert thresholds are reached.
Word Clock§
The Word Clock uses a stencil behind the front plate to display the current time. We have a video documenting how to turn a stock Icon64 into a Word Clock.