2.9″ ESPaper Plus Kit§
How to assemble and program the ThingPulse ESPaper Plus Kit.

Hardware§
In order to save as much energy as possible during regular usage we decided to separate the USB-to-Serial converter from the display module. This means that we need an external device, included in the kit, to re-program the display device. You can of course use any other USB-to-Serial converter which supports 3V3 logic levels just as well.
Install drivers§
A prerequisite to program ESP*-based modules usually is to establish a communications channel from your development platform (PC, Mac, Linux) to the device over USB. This in turn requires your system to detect the USB-to-Serial (aka USB-to-TTL, aka USB-to-UART) adapter on the ESP8266 or ESP32 module. There are two commonly used adapters in the wild these days:
- Silicon Labs CP210x
- Winchiphead CH340x / CH341x
Newer boards (2022+) often use the Winchiphead CH9102 chip.
Popular modules that use the CP210x are:
- NodeMCU v1.0 (i.e. V2) module
- WeMos D1 mini Pro (some revisions)
- ThingPulse ePulse ESP32 dev board
- ThingPulse Icon64
Examples of modules that use the CH340G chip are:
- WeMos D1 mini
- D1 mini Lite
Examples of products that use the CH9102 chip are:
Note that there is no harm done if you install both drivers even if you currently just use one! If you are not sure which adapter your ESP8266/ESP32 module uses then just install both.
Silicon Labs CP210x§
Silicon Labs maintains a page in English that lists downloadable driver binaries that also contains installation instructions.
Winchiphead CH340x / CH341x§
Winchiphead (WCH) maintains its website only in Chinese. However, the download page for the drivers is so simple that even non-Chinese speakers will find the right download link.
Warning
Some systems require a reboot before the driver installation can be successfully completed. The installer may or may not tell you about this! If you later connect the ThingPulse device and the system does not recognize it try rebooting as a first measure..
Winchiphead CH9102§
Follow the instructions over at Adafruit.
Software§
Prepare Arduino IDE for ESP8266§
The Arduino Integrated Development Environment (IDE) is the tool you will use to program the ESP8266. IDEs are more than just editors; they help you with various tasks during the development process.
To install the Arduino IDE go to https://www.arduino.cc/en/Main/Software and download the latest version for your operating system:
- For macOS you can download a ZIP file which you then have to extract.Take the extracted application “Arduino” and move it to your 'Applications' folder.
- For Windows you have the option between an executable installer and a ZIP file.The ZIP file might be the better option if you do not have administrator permissions on your system. The installer on the other hand can put the libraries in the proper places.
Now you have a bare Arduino IDE which brings everything needed to write programs for the standard Arduino ATmega chips. But we want to write and compile code for the ESP8266.
Install the ESP8266 toolchain§
A tool chain is the set of tools that lets you compile and create binaries for a certain platform. Since we want to create binaries for the ESP8266 we need a different tool chain than the one that comes with the plain vanilla Arduino IDE. One of its wonderful feature is the Board Manager. It lets you install support for many different chips and boards with just a few clicks.
- In the Arduino IDE open the preferences/settings and enter http://arduino.esp8266.com/stable/package_esp8266com_index.json into the text box Additional Board Manager URLs.
- Now go to Tools > Board: ... > Boards Manager..., search for the "ESP8266" board and click Install. Note: ThingPulse does not recommended to install beta or RC versions.
- Take a break until the installer finishes.
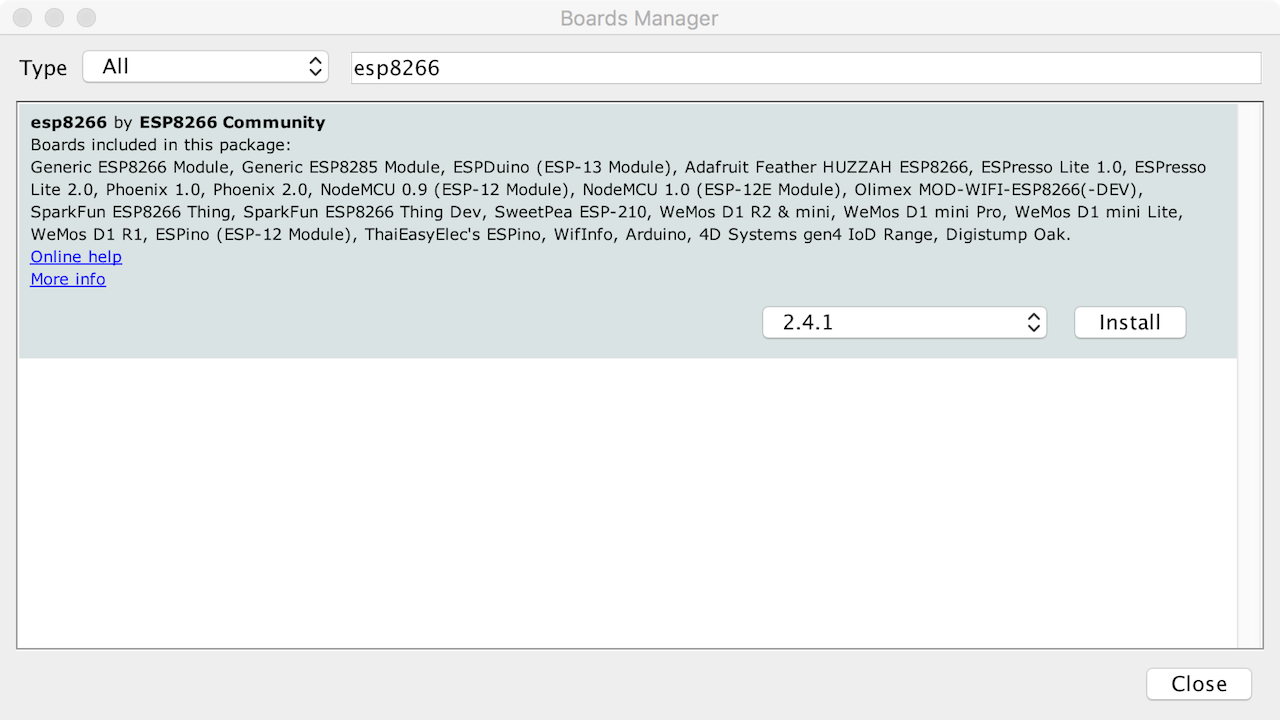
From time to time you want to come back to the Board Manager and make sure that you have the latest non-beta non-RC version of the ESP8266 tool chain installed. To do that simply click on the ESP8266 entry and select the latest version from the dropdown. Then hit Update.
Connect the programmer / USB-to-serial converter§
It’s now time to connect the USB-to-serial converter, which came with the ESPaper Plus Kit, to the ESPaper. Plug in the
programmer with the electronic components on its PCB facing down/back. The +5V plug has to go onto the 5V pin on
the ESPaper as per the photos below.

The programmer provides enough power to drive the ESPaper while you are programming it. However, it is more efficient to use the USB port to charge the battery than to use the programmer for this purpose.
Note
Don't forget to connect host system and programmer with an USB cord and turn on the ESPaper module (on/off switch).
Danger
Do NOT power the device via USB port and programmer simultaneously.
Select board and serial port§
The Arduino IDE knowing about ESP8266 modules in general is not enough as they are not all the same. There are subtle
but important differences as for available flash memory and how they can be programmed. The selection of the correct
board also defines the names of the GPIO pins. The designers of the NodeMCU module for example decided to introduce a
completely new naming scheme for the pins. Instead of calling them GPIO1, GPIO2, etc. they relabeled them and
prefixed each one with “D”. D0 is GPIO16, D1 is GPIO5 and so on. By selecting a specific board in the Arduino IDE
you automatically have the correct naming scheme and other relevant parameters available,. This helps a lot as for
the NodeMCU modules for example those names are also printed on the PCB.
Not all ThingPulse kits come with the same ESP8266 chips/modules. We carefully selected the best option for each kit. It's essential that you know which module you get with a specific kit so you can configure Arduino IDE correctly
- Starter Kit → NodeMCU 1.0 aka v2
- Color Display Kit → LOLIN(WEMOS) D1 R2 & mini
- ESPaper Kits → Generic ESP8266
In the Arduino IDE do as follows:
Tools > Board: * > select as per the above list
In an earlier step you installed drivers for the USB-to-Serial converter. If everything went well and the device is
plugged into your computer you should now be able to select the serial connection. It should show up in the Menu
under Tools > Port. On macOS the serial devices are called /dev/cu.xxx. On a PC it should be listed
as a COM port labelled COM# (where # is some number).
If you cannot see your device in the port list, try to unplug it and re-plug it after a few seconds. Also try a different USB socket. If that does not help try restarting your computer and/or try with a different USB cable.
Warning
Depending on what you had previously been working with in the Arduino IDE you need to adjust the UART baud rate. Tools > Upload Speed should be at least 115200. Depending on host OS and driver you can go all the way up to 921600. You need to experiment with this setting a bit; higher is better of course.
Now open the serial console in the Arduino IDE and see if there is output when you turn the ESPaper module on (e.g. by using the ON/OFF switch). This can look like garbage, but if you see characters your computer is capable of talking to the device.
Select flash mode and flash size§
The ESP-WROOM-02 chip used by the ESPaper Kits has an embedded 2 MB SPI flash memory. It hosts the SPIFFS file system the application will later write files to.
- in Tools > Flash Mode select "QIO"
- in Tools > Flash Size select "2M (1M SPIFFS)"
The application might fail to transfer or fail to start if the flash options are not configured properly.
Install libraries§
The ThingPulse ESPaper depends on a number of other libraries. They need to be made available to the Arduino IDE for them to be compiled and linked into the final application.
Go to Sketch > Include Library... > Manage Libraries.... Then, for each library, put its name into the text field to have its metadata pulled from the internet and displayed below. Select the latest version and install it. Make sure to come back to this dialog from time to time to keep each library up to date. Also make sure that you only have one version of each of the libraries installed.
- Mini Grafx by Daniel Eichhorn
- ESP8266 WeatherStation by Daniel Eichhorn
- Json Streaming Parser by Daniel Eichhorn
- simpleDSTadjust by neptune2
Create OpenWeatherMap API key§
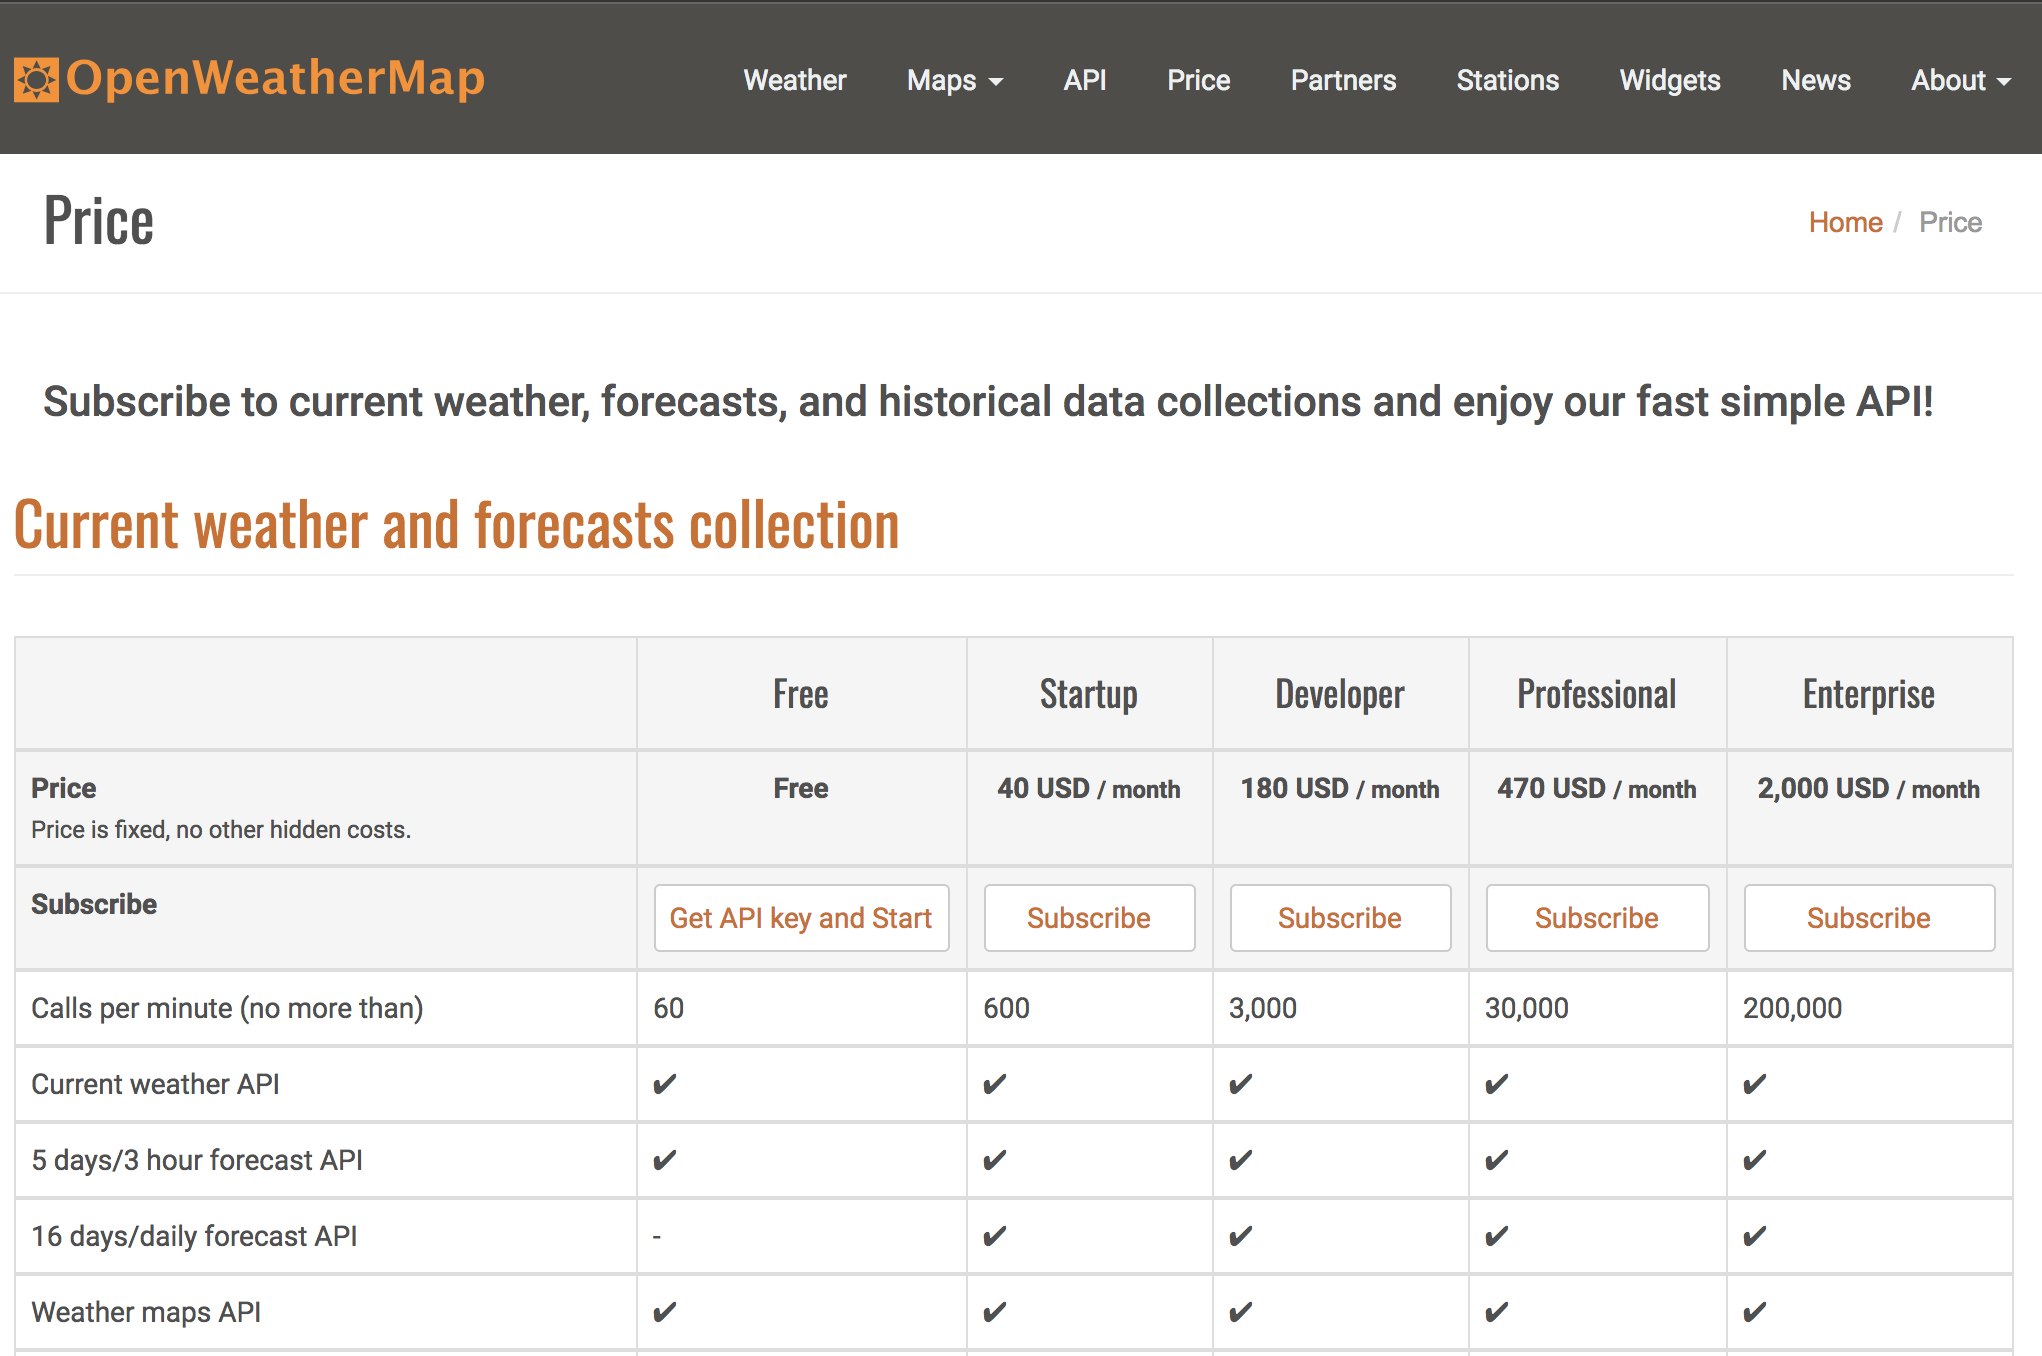
As your device will be displaying data from OpenWeatherMap you need an "API key" from them. It uniquely ties requests from your device(s) to your account and ensures that the number of requests remains within your allotted quota.
- Go to https://docs.thingpulse.com/go/create-openweathermap-key
- Take note of the features in the "Free" column. By using the free plan you are limited to 60 calls per minute.
- In the "Free" column click on "Get API key and Start".
- On the "How to start" page click on the "Sign Up" button
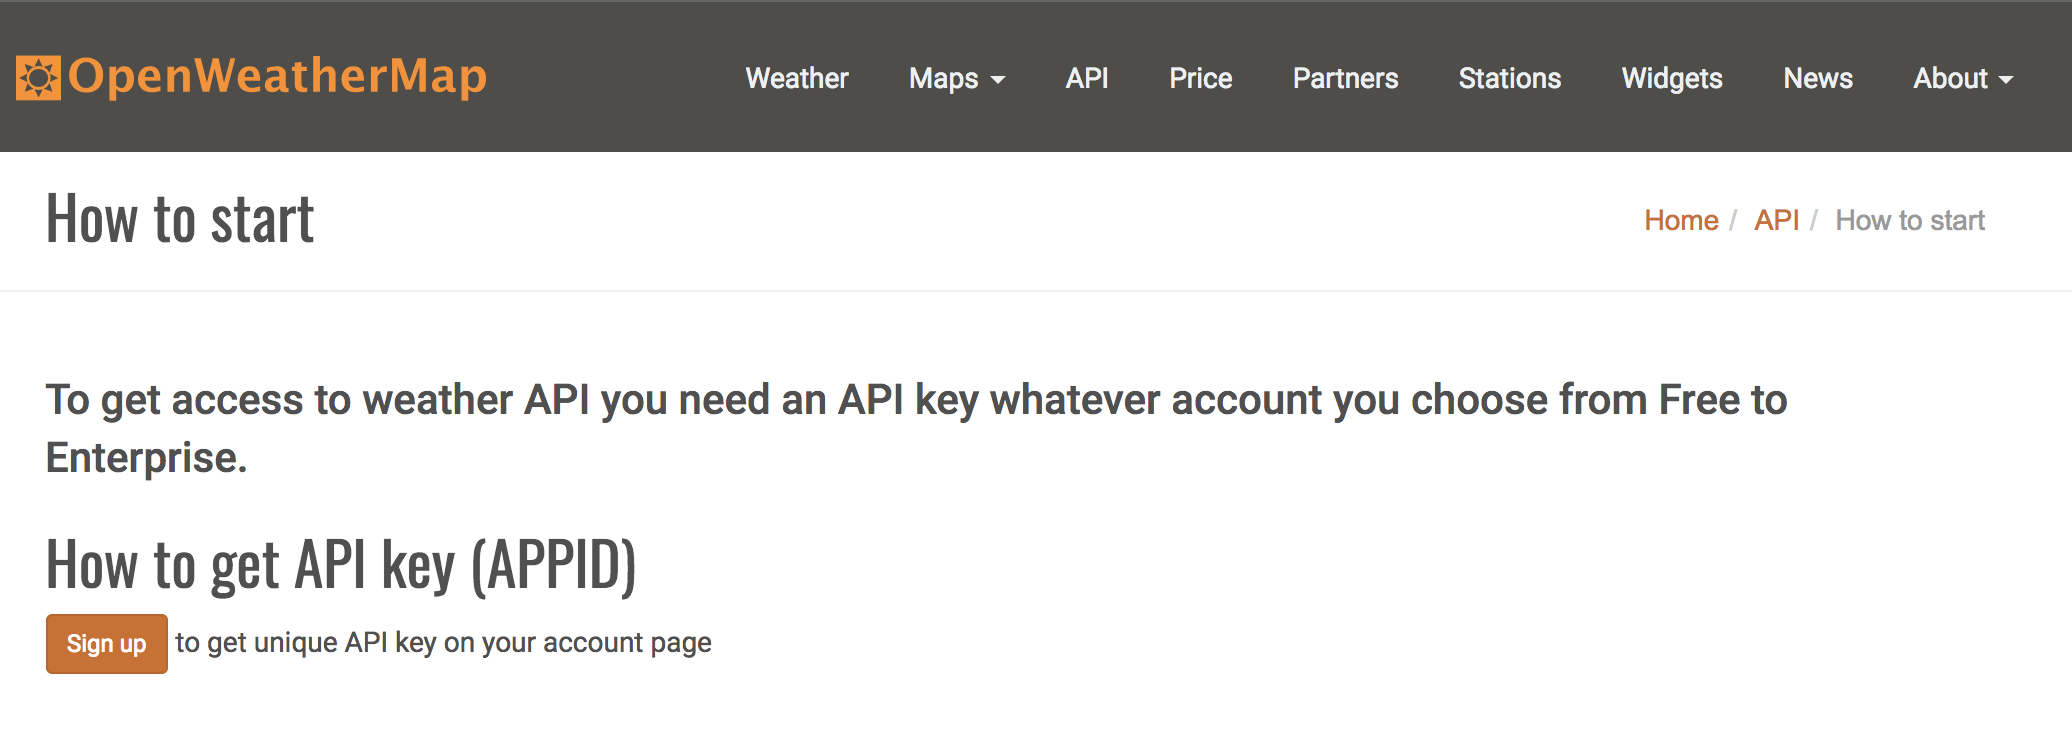
- Fill in email and password to sign-up for a new account

- Remember the key generated here
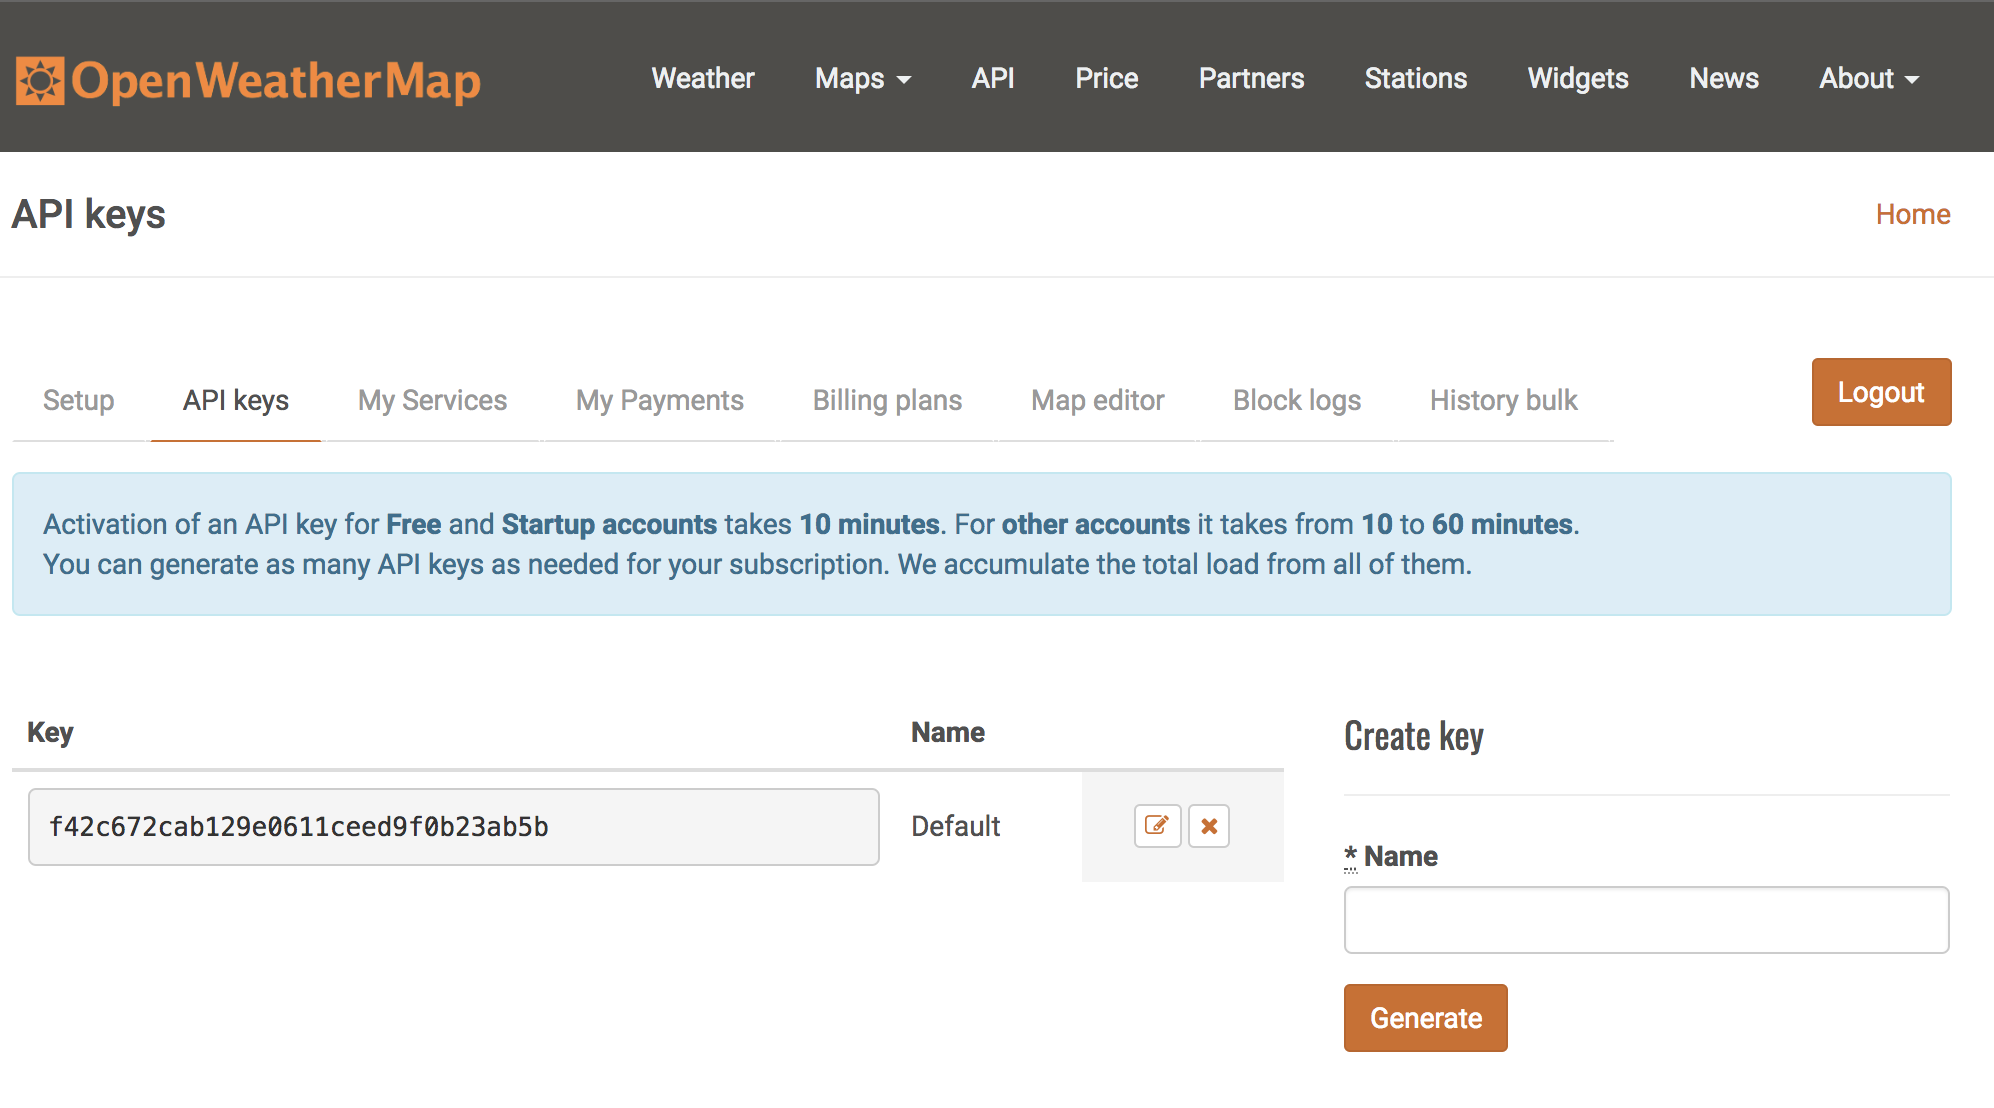
Once the API key is created you can come back to this page any time to edit or delete it.
ESPaper project§
With all the preparation done you will - finally, sigh - turn to the ESPaper weather station project itself. Fortunately, this last step is a rather simple one.
Obtain the code§
The ESPaper weather station project is, as all of ThingPulse's open-source code, publicly accessible on GitHub. Hence, there are two options to download the code:
- Clone the repository with Git:
git clone https://github.com/ThingPulse/espaper-weatherstation - Download the sources from https://github.com/ThingPulse/espaper-weatherstation/archive/master.zip and unpack them somewhere to your local file system
Open project in Arduino IDE§
- Start the Arduino IDE
- File > Open
- find and select
espaper-weatherstation.inofrom the previous step.
Configuration & customization§
In one of the tabs the IDE opened settings.h.
Go through the file and adjust the two handful of configuration parameters. They are all documented inside the file
directly. Everything should be self-explanatory. Most importantly you will need to set the OpenWeatherMap API key you
obtained in a previous step.
Replace WIFI_SSID with the name of your WiFi network and WIFI_PASS with its password. While there are nice
tools like the WifiManager which avoid storing the WiFi credentials in the firmware but they also take more time to
connect to WiFi, which in turns reduces your battery life.
Copy the OpenWeatherMap API key you got in the previous step and assign it to OPEN_WEATHER_MAP_APP_ID.
Change the UTC_OFFSET field according to your time zone. The value is the number of hours your timezone is ahead
or behind UTC/GMT. If you are not sure about the DST rules look them up.
Put ESPaper into programming mode§
When we designed the ESPaper we valued energy efficiency higher than convenience for users. Of course, in the long run high efficiency is convenient as well as it reduces the re-charge interval. However, this means that the ESPaper module does not have this nice circuit which puts the integrated ESP8266 into programming mode when you click the upload button in the Arduino IDE. In order to program the chip we have to put it into programming mode manually. Below image is from an ESPaper Lite Kit but the process is the same:
- Press button S0
- Hold it down while pressing RESET
- Release RESET
- Release S0

Upload code to device§
The very last step really is to upload the code and all its dependencies to the device from the Arduino IDE. You do this through CTRL + U (⌘ + U on macOS) or Sketch > Upload or the right-arrow icon in the toolbar.
Should this fail make sure that there is a port selected in the tools menu. Disconnect the module from the programmer and reconnect it. Make sure that they are connected correctly. Put it into programming mode again.